Tactical Homesteading: Your space and its use

This article is part of a series discussing if Homesteading is right for you, and the advantages and disadvantages of more rural living.

In the last post there were several considerations about the location of your homestead. Commuting and telecommuting, distances you can tolerate, a more isolated lifestyle, infrastructure needs, and risks and resources. In this segment, let’s consider what we can do with our property and how we can put the land to work for us.

Available resources

The first thing to assess is the resources already available on the land. What foliage exists, and what types of flora might be beneficial to invest in. When I purchased my property, the original owner had planted many apple trees. The advantage is I have abundant apples, but years of neglect have destroyed many of these trees and bringing them back to health has been a chore.

Additionally, we’ve found very large sugar maples, and made maple syrup for the first time. There are abundant blackberries. We found a large patch where morel mushrooms grow in abundance.

We have countless deer, rabbits, and cranes visit our yard regularly.

The natural woodland one would expect is a bit missing on my property; the previous owner having cleared much of it away for an orchard. I heat with firewood, and there is limited standing timber to harvest.

I have wetland on my property, and a small lake only 50 yards off my property line. A cordial neighbor agreed to water access and fishing rights.

Our first full jar of maple syrup! Tag added for fun!

Accessing the resources

Once the resources are identified, it makes sense to ease your ability to get to them. Whether making a path through the overgrowth, turning a section of overtaken orchard back into ‘yard’, or even installing a dock, getting at needed resources is very important.

When I was clearing some overgrowth with my tractor, I noticed a gap between the trees. The grass was easily 5′ tall in this area. I put my front end loader near the ground. This not only beat down the grass and prevented my tractor’s radiator from becoming loaded with debris, but it acted as a handy probe in case of rocks or stumps. The rear of my tractor was equipped with a rotary cutter, able to mow down all manner of foliage and even saplings up to 3″ thick.

As I followed the new trail, I realized it must have once been the access road for the orchard. It circumnavigated the entire orchard area, and finally doubled back to the central area I had built my house.

This trail now provides important access to the wetland, the maple trees we tap for syrup, and out to the corners of my property.

Start grooming the land

Similarly to utilizing the resources already at hand, start grooming the land for expanding its capabilities to meet your needs. For me, that was putting in a gun range. It was also clearing back much of the overgrown grapevine and Asian Bittersweet that has invaded the property.

Depending on how much land you have and the amount of work you want to do, you may leave some land overgrown and natural. It’s fine.

Importantly, LEARN TO GARDEN AND BUILD A GARDEN. This is the one thing I wish I had gotten to earlier. It doesn’t take much to install one, and garden maintenance can be one a few hours a week. The self sufficiency gained is very important as you get real, tangible results after only your first season.

Look over your garden and revel in the self sufficiency it will one day provide. No HOA Member telling you the tomatoes are ‘unsightly’, or the sunflowers are bringing too many bees to the area…

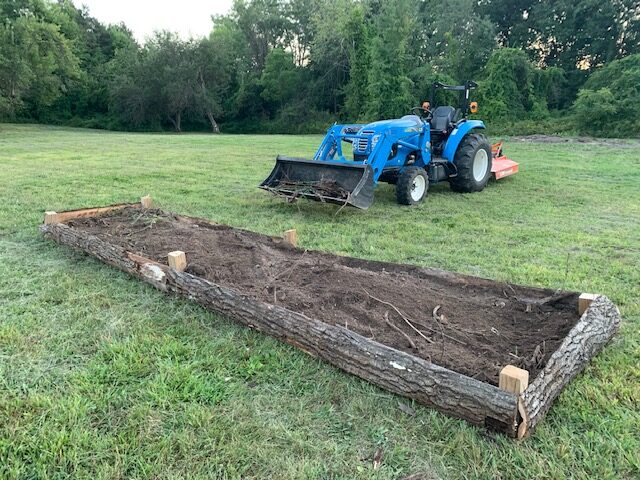
A 16′ x 4′ raised bed garden

Assess your needs

Now that you have something started, grow into it. Trying to feed a family of 4 with just what you grow, and hoping to accomplish that right away, carries a high chance of failure. Weeding the garden is hard at first. What is food and what is unwanted. How hard is it to tell? Why does my back hurt? You definitely have the energy for a smaller garden, and can work your way up as you gain experience.

Within a couple season, you’ll have a great idea of what your family likes and dislikes, what you might be able to sell, and what grows best in your area. Use that knowledge and focus on it; just don’t focus to the exclusion of other things. You family has dietary needs, both nutrients and caloric intake.

After a couple years is the time to truly start to assess those needs and expand for them.

Building infrastructure

Whatever you add, you will likely need equipment to upkeep it and make it thrive. IBC totes allow you to store water for the long haul. This is great for gardening.

If you are making syrup, a network of tubing and a way to route it might need to be thought up. Trees might need pruning while you know what branches are healthy in the summer.

I built a small shed for my gun range. No more lugging targets, pylons, staple guns, and other equipment every time I go out there.

Find the experts who KNOW each topic. Trade them your knowledge or pay them.

This is a marathon!

Remember, you will not achieve self reliance and sustainability overnight. It will take a couple of years just to feel like you’ve gotten started. A few more to feel like you’re thriving. Along the way, you are getting better. More knowledgeable. Wiser. You’ve worked, and know what works. Things go from a “That’s impossible!” to “Gimme 5 minutes” pretty quickly.

Setting up a home quarantine room

The world is watching the Coronavirus spread with great concern. Prior to that, it was Ebola, or HIV, or whooping cough. In our increasingly interconnected world, disease can spread quickly and over great area. The Coronavirus has hit Wuhan, China hard. One of China’s major trade centers is effectively shut down, with industrial implications for the entire world.

Here at home, Michigan USA, the concern has become real. Being the cradle of the US auto industry and much of that industry having ties to China, it is not a stretch to realize it will affect our economy significantly. How can we, as emergency preparedness practitioners, take steps to ensure our family remains safe?

Understanding how disease is transmitted (routes of transmission)

There are 3 main types of disease transmission. Setting up a home quarantine room will need to ensure that all forms of pathogen transmission are addressed.

Aerosol

This form of transmission is when the pathogen are suspended in the air, either through vaporous liquid droplets (like coughing and sneezing) or particulates (like dust or pollutants). The pathogen is then inhaled, absorbed by the recipient (through eye or mouth deposit) or deposited onto a surface and later touched. Most pathogens do not survive long in an aerosol state, and close proximity to the infected person is required for transmission. Coughing, sneezing, and exhaling are all forms of initiating aerosol transmission.

The COVID-19 virus has been found to be transmissible through aerosol.

Direct contact

Transmission is achieved when contact is made with the pathogen. The pathogen is usually introduced by contact through skin, blood, mucous membranes, saliva, etc.

Oral/Consumption

Pathogens are often introduced through food and water. Unclean practices like failure to wash hands can introduction fecal and urine particles onto food which sustain the pathogen long enough for transmission.

There are other subtypes of these transmissions. Venereal is direct contact through reproductive activity. Fomite transmission is when a carrier touches an object that is later touched by a receiver (such as door handles, etc.). Vector-borne is a direct contact transmission through a carrier, such as a mosquito.

Considerations for the quarantine room

The widespread nature of this virus means for most of us, it will be a matter of when, not if, a loved one gets it. With hospitals quickly reaching capacity, the need WILL be to stay home and self-quarantine.

The following items and considerations will be needed to effectively quarantine a room and be able to tend a patient at home. Note that these considerations are to reduce/eliminate pathogen transmission. They do not include patient treatment. Isolating pathogens to this room and preventing spread to other areas is the primary objective.

Sanitation cart

A cart that can be easily moved as needed is ideal for a sanitation cart. Some people will choose to use a stationary location such as a linen closet or bathroom cabinet. Whichever is chosen, it should be easy to access and easy to determine when supplies are running low. Consider the following items for a general sanitation cart, and UNDERSTAND what items are applicable for the pathogen in question:

  • Antibacterial wipes.
  • Bleach (or other medical grade cleaner) and cheesecloth towels.
  • Disposable nitrile gloves.
  • Face shields, face masks, and safety goggles.
  • Biohazard and vomit bags.

Room preparation

If at all possible, the quarantine room chosen should be free of porous materials and surfaces. Cushioned furniture aside from the bed, clothing in closets, stuffed animals, papers, books, carpet, and more, should be removed or minimized. This may be well above and beyond the capability of most to do, but understand that these surfaces can harbor pathogens and are a risk to those giving care to the quarantined person.

The quarantine room should also be chosen, ideally, to have its own bathroom with shower. With water vapor, toothbrushes and toiletry needs, and human waste disposal, this bathroom is a significant source of pathogen transmission.

Quarantining aerosol pathogens

This is the hardest thing to accomplish, as airborne pathogens can become direct contact pathogens as well when contaminated particulates land on surfaces. Those items will be covered below, and this section will focus on the aerosol nature of transmission only.

Create an entry/exit barrier. In addition to the room’s door, a plastic sheet hung a few feet outside the door creates a double-door barrier with an ante room space between them. This is the bare minimum necessary for effective quarantining. The care giver can gown outside the area, enter the first “door”, close it, then enter the second door. This greatly reduces the pathogen’s likelihood of escaping the quarantine room. When exiting, the caregiver leaves the second door, closes it, de-gowns and disposes of the gowning material inside the ante room space, then exits the first door and disposes of the gowning material.

While cleaning the quarantine room, vacuum carpet using hepafilter vacuums only, while wearing face shield, goggles, and respiration mask. This is a high risk activity that is agitating particulate matter in the room. Another alternative is to use a true steam-cleaning carpet cleaner at 170F or at least 5 minutes per surface, or 212F for 1 minute per surface.

If cleaning items in the room, minimize movement of the items, and do not shake out bedding, clothing, or other fabrics. This releases whatever pathogens were on them into the air. Aerosol transmission is the most difficult to mitigate. Do not take a direct contact item (pathogen on an object) and purposefully make it an aerosol.

If the temperature allows for it, close the vents from this room to the rest of the house. If conditions do not allow for it, add filtration and UV irradiation as necessary.

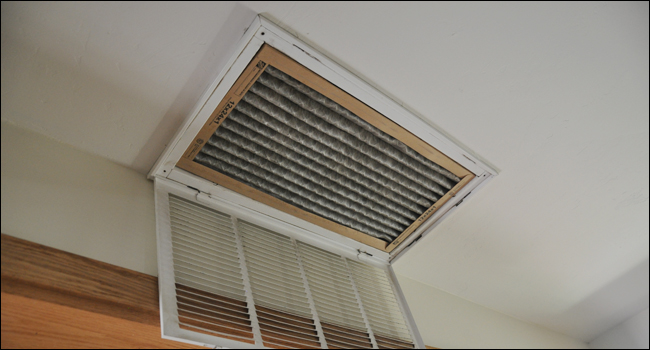
Install cold air return filters in the quarantine room and bathroom. Filters are rated with a “MERV” value, and a MERV value of 13-16 are medical grade that block bacteria, most dusts and aerosols, and suspended water droplets. Well ahead of needing this room, install a cold air return register than accepts these filters.

For the furnace filter, install a filter with at least a MERV rating of 9-12, but 13-16 is better. By the time a pathogen has gotten to the furnace, it will have traveled several yards or more. Most pathogens cannot survive an extended period of time in open air, and between the cold air return filter, the distance to the furnace, and the furnace filter, there is little chance of a pathogen being redistributed into the house’s HVAC system. These filters are an excellent preparedness item to stock up on before they are needed, and kept in their sealed packaging until needed.

Some return vent housings are able to accept filters in them.

Portable air filters that use filtration (not ozone) can help, but one must purchase the correct filters (HEPA only, not “HEPA style”), change the filters as indicated (they can get expensive), and actually leave it running.

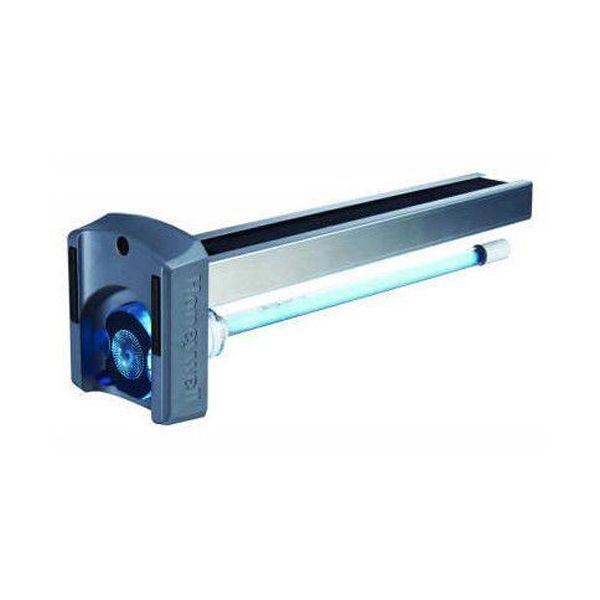
Another excellent means of air filtration is an Ultraviolet furnace insert. These high intensity ultraviolet bulbs are excellent to destroy virus, bacteria, and mold, with the added benefit of reducing maintenance for mold on AC coils, etc. They can be expensive, but this is one of the more certain ways one can ensure air returning to the rest of the house is virus-free.

Quarantining direct contact pathogens

By creating a quarantine room, an attempt is being made to limit direct contact to one area only. Regular cleaning in this room is required, and wiping down all flat surfaces regularly with antiseptic cleaner is an important first step in minimizing direct contact transmission. Here are a few other tips:

  • Be prepared to dispose of everything: The clothes in this room, the cot/bed, blankets, books, TV Remote, etc., can all hold a pathogen. While a pathogen may not live on a surface for very long, porous surfaces can hold enough contaminant to allow a pathogen to live long enough for transmission. It may not come to this, but be prepared for this.
  • Learn to degown in the correct way so that degowning does not create an exposure. Have waste bags available for disposed of gowning.
  • Any eating utensils and serving ware should be immersed in a tub with bleach concentration, fastened with a lid, and removed to the house’s kitchen area.
  • Read, understand, and practice the surface decontamination methods for the cleaners you are using. Lysol disinfectant sprayed on a surface requires TWO MINUTES to be fully effective. This is very different than the typical wipe on / wipe off method most people use for cleaning.
  • Wear a face mask and goggles when dealing with all things in this room. It will help with instinctually touching face and eyes.

Quarantining oral/ingested contact pathogens

For quarantining, an important objective is to ensure food items and eating utensils do not pose a threat to those that use them subsequently. For best results, dedicate a set of utensils to the infected person and wash them separately. If this is unmanageable, soak the utensils and serving items in a basin with 1 tablespoon bleach per 1 gallon water for at least 2 minutes after all extra food material has been rinsed or scrubbed away. After that, run in the dishwasher with the highest heat setting available.

Cleaning kitchen sponges, washclothes, and more can be done by soaking in the same bleach concentration, then rinsing well, putting on a microwave safe plate, then microwaving the items for 2 minutes on high. Ensure there are no metallic strands or abrasion materials in the cleaning supplies when doing so.

Another important factor to consider is preparing foods in a clean way. First, ensure that the food preparer is not ill. Notrile glove, mask, and eye protection are excellent means to prevent contamination of food items, as is minimizing the handling of packaging and subsequent handling of the food item.

For cooked items reaching high heat, they will be pathogen free after heating up provided the heating goes above 170F for at least 5 minutes (assuming the heat has time to transfer throughout the food so that all areas of the food are 170F for at least 5 minutes). The very best practice one can do is to minimize direct contact with the food after heating.

Conclusion

Not all the above items will be affordable or even necessary depending on the pathogen that is being quarantined against. Nor should the above take the place of medical professional practices. This article should be seen as things to consider, and best practices to thoroughly research and enact.

Our very best option is to self-distance and prevent getting this virus in the first place.

Maintenance: The not-so-glamorous byproduct of preparedness

There’s a thrill coming home with a new firearm, a new pack, a new radio, etc. Preparedness aficionados love new gear associated with their lifestyle just as much as a golfer loves his new putter or your rich dentist loves his new Corvette on track day.

Even before the thrill of coming home with New Toy, we tend to have a great time comparing specs, reading reviews, and optimizing our kit for its intended role. What optics will work best on the new Glock? What kind of range can I expect from this Yaesu handheld? What’s the best steel for my new pocket folder?

What is not as glamorous or exciting is the maintenance required for such things… For most, it isn’t even considered. But, with each piece of new gear, we must carefully ascertain maintenance needs it will require.

Preparedness must be as much about the learning of, and maintenance of gear, as it is acquiring new gear or new skills.

I recently moved to a 13 acre parcel of land in the ‘far suburbs’. This was done to get away from HOAs, provide a more semi-rural experience for my son, and to start down a more self-resilient lifestyle. I am slowly doing that.

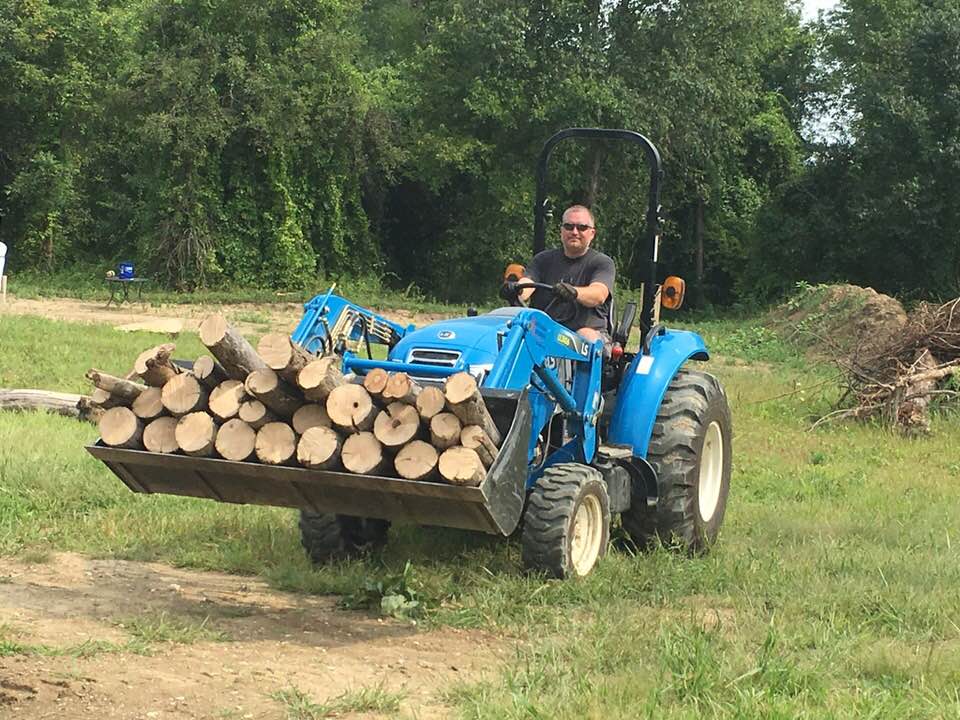
In this effort, I needed to get a compact utility tractor. This is the class of tractors that have a front end loader, and can pull basic ground-engaging implements like rakes, rotary cutters, a rear blade, and more. It was the most phenomenal New Toy I’ve ever purchased, and it changed my capabilities from “I’ll never be able to get that done” to “Eh, gimme 10 minutes…”. In the first year of ownership, I cleared well over an acre of very heavy underbrush in an ancient apple orchard to a cleared area with the apple trees remaining. This year, I’ll likely clear another couple acres. I also cleared snow from my 0.33 mile driveway and private road, moved multiple cords of firewood, and more.

To a preparedness enthusiast (I despise the word ‘prepper’) this tractor represents so much capability to turn my land into an investment that will serve my family and further my goals to a resilient lifestyle. Running it is fun, getting work done on it is beneficial, and the experiences of doing these things ourselves is very fulfilling. Imparting this can-do mentality to my son is priceless.

The tractor takes maintenance. Every year I have to change oil, oil filters, check hydraulic fluid, grease over a dozen joints, adjust settings, clean air filters, and more. Every few years I have to change over 10 gallons of hydraulic fluid and a filter, bleed these systems, maintain the diesel filters, and other things. The attachments need basic maintenance as well. It doesn’t take a ton of time to do any one of these things, but it does take some. Doing them all can be a day of work.

Likewise, I have that handheld Yaesu radio in my pack as well as a backup battery for my smartphone. I have to remember to keep them charged. The optics on my bug out rifle? I need to test them and swap batteries at regular intervals. Got your water bottle full on your Get Home Bag? How long is that good for?

Organizing maintenance

If you’ve taken our Emergency Preparedness 1 class, you’ll remember that each threat component should have a corresponding matrix of activities. (If you haven’t taken our Emergency Preparedness 1 class, take this time to sign up here.) In each category, we do a pre-threat rundown on things to get, get trained on, and maintain so you’re prepared for an event. The maintenance must be part of that pre-threat rundown.

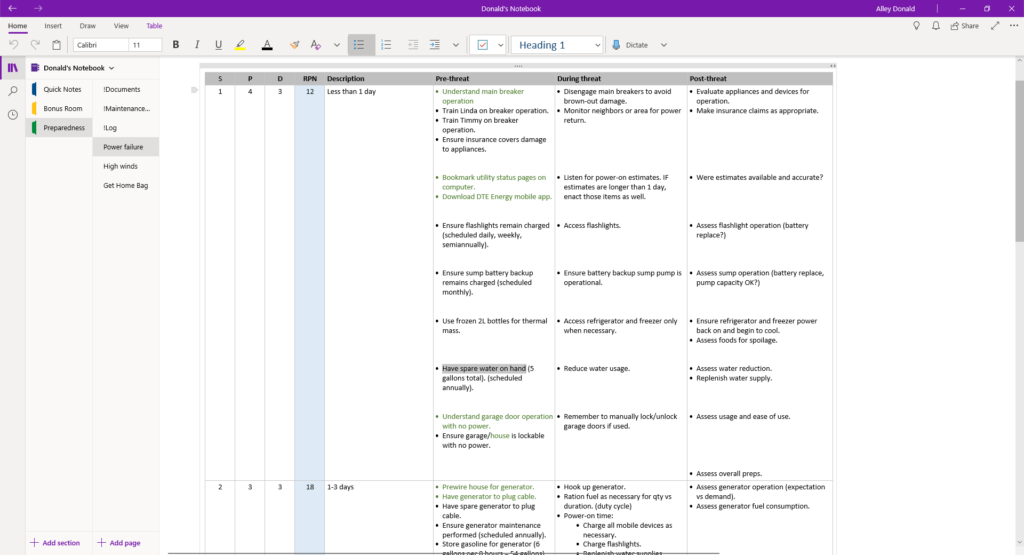
Power failure threat matrix

Here is a page from my threat matrix for power failure. As an aside, I am still working on my threat matrices as well since I moved, and am using it as an opportunity to learn Microsoft OneNote. OneNote is an excellent program for data organization and after the ‘structure’ of the program is understood, is intuitive and versatile. As I transpose info from my previous Excel sheets and reassess for my new home, I am populating more in this OneNote file.

In my Power Failure threat matrix, my task of “Ensure flashlights remain charged” is a daily, weekly, and semiannual task. Why? My tactical flashlight gets tested every morning as I put it in my pocket. Just a short on/off to ensure it works. Weekly, my bedside flashlight gets recharged. Semiannually, the batteries in these get replaced whether they need it or not. These entries in my threat matrix get added to a Maintenance page in the program where they are all listed out; all maintenance items from all tabs. I then have a Log tab where I record what I did for each (though I tend to keep daily and weekly items off it, just too much documentation for no benefit).

Once the threat matrices are complete for all threat components, we’re left with a list of what items require maintenance. Having this list is nice, but we still have to make it a part of our routine.

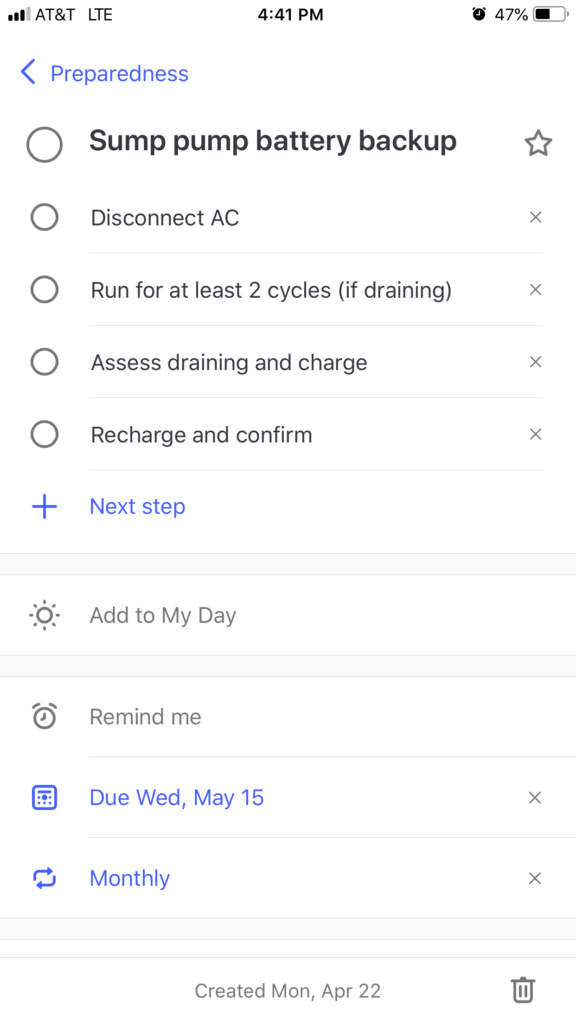
I’ve opted to use Microsoft To-Do on my iPhone. It allows for tasks, subtasks, recurring tasks, and more. It is comprehensive enough for in-depth task details but still very user friendly. Microsoft did a great job with this. If you have a preferred task manager that you use, go for it. I highly recommend one that allows recurring tasks, though, since that is the objective of this exercise.

Screenshot of Microsoft To-Do task manager

It can take some time creating useful To-Do’s from each maintenance item, but once they’re in your list, it is far easier to make emergency preparedness maintenance items a part of your routine.

Another important thing to remember is to create a Go-Bag or Get-Home-Bag inventory as well, and ensure you have covered maintenance items from that. In my GHB, I have the Yaesu handheld radio, as well as a battery back up for my iPhone. I have the recurring task of charging these weekly. I have some freeze-dry food that I swap out annually, and a water bottle that I cycle the water on weekly (it is not commercially sealed). In my full Bug out Bag I have more items, including testing and swapping optics and sights batteries.

Take away:

Is any of this as glamorous as posting your new AR-15? No. Is it as cool as Instagramming yourself eating a grub or bowdrilling a fire? We prepare to help ensure an uncertain future is at least a stable future through risk reduction. As such, it is just as important to pay attention to upkeep on the preps you already have as it is to get new preps. Without proper maintenance, your preps are in an uncertain state. Just like the condition we are hoping to avoid.

Vehicle emergency kit (Winter)

We have an emergency preparedness class for a reason. That reason is that 99% of all threat we face is not interpersonal conflict, it’s us against some condition or event. Let’s be prepared for that, and equip our vehicles with a great emergency kit.

So what goes into a vehicle kit for the winter? Start with this list:

Vehicle needs:
Ice scraper/brush.
Extra wiper fluid.
Jumper cables.
Air compressor and tire gauge.
Tire replacement tools (jack, lug wrench, etc).
Foam tire sealant.
Fire extinguisher.
Basic tool kit. (Includes robust utility knife.)
Spare vehicle fuse kit.
Reflective markers and vest (yes, really).
Work gloves and safety glasses.
Tow strap.
Sand or kitty litter for traction. (Or MaxTrax).
Shovel.
Headlamp (with spare Li Ion batteries).
Extra coolant.
Extra oil.
Paper towels and rags.
Container for these items.

Shelter:
(Assumes occupants already have winter jackets.)
Blanket for each occupant.
Hat, mittens, wool socks, and boots for each occupant.
Lighter, matches, and at least 3 tea candles.

Hydration/Nutrition:
At least 1 bottle of water per occupant.
At least 1000 calories / occupant in energy bars.

Rescue/Mitigation:
Spare cash (approx $300() for towing/hotel, repair.
Phone charger and cable.
GPS (if not in phone).
Paper maps.
Vehicle first aid kit.

Remember, your car kit is not just a list of stuff. Each item assumes you have the training and know-how to use the stuff AND that you have dry-run using the stuff. Are you SURE your air compressor works? Are you SURE its cable and hose are long enough to reach all the vehicles tires? Are you SURE your tire jack works?

Additionally, around this time is a great opportunity to evaluate your vehicles for winter readiness:

Antifreeze/coolant level and freezing point test.
Battery maintenance (if applicable). Replace weak batteries NOW.
Inspect brakes.
Inspect fuel and air filters.
Inspect heater and defroster operation.
Test all lights and turn signals.
Monitor your coolant temperature level over a few days. Replace thermostat is unexpected temperatures are experienced.
Top off your windshield fluid.
Test wipers or replace with heavy duty winter-intent ones.


The Get Home Bag (Cold weather)

Most emergencies are weathered by shelter-in-place, meaning we aren’t going to leave the home to go somewhere else. The home is the shelter of choice for them. ALL preparedness plans should begin with a thorough planning regiment and only then move to developing some type of emergency bag for evacuation. When we finally do get around to making these bags, they should support the PLAN we’ve already made.

There is one exception: the Get Home Bag.

The Get Home Bag (GHB) has a single purpose. To have the tools and resources on hand to get home from wherever you may be. The GHB should assume the worst case for getting home, such as in a blizzard, and having to travel on foot.

Here are some common assumptions:

  • Inclement weather (dangerous cold, snow).
  • Late start time (the emergency happened in late afternoon or early evening).
  • Longest commute distance regularly encountered by the individual.
  • Vehicle unavailable early (the vehicle broke down or was blocked initially or early in the trip, most of the trip will  be walked).
  • Reasonable physical condition. Able bodied, and generally able to hike for 8 hours a day with breaks with a 20 pound load.

In modern suburban America, the average commute is 16.2 miles one way. Extreme commute distances (more than 30 miles one way) is the fastest growing commute segment. It is important to be honest with one’s commute distance and train/prepare for it plus up to 50% more (detours, escape/avoidance, etc).

The first step is determining what the requirements for the GHB are. This article will assume a 25 mile commute one way, and that worst case, the GHB must be employed immediately (the trip is starting out on foot rather than abandoning the vehicle after several miles into the commute).

There is a check list at the bottom of the article. We’re going to ‘game’ this scenario a bit, to understand some of the intricacies. It’s better to read everything and understand the rationale for some items and determine if there is need for them in YOUR plan and YOUR kit.


Assess the situation

Overcome normalcy bias. Now. You’ve entered a situation that may require outside-the-norm decision making. Yes, when you leave work for the day and drive home, that work laptop is important. If you have to ditch the vehicle to walk home, is the laptop worth taking, or is it dead weight? It is important to become brutally honest about the situation, the priorities, and the consequences of decisions.

Hint: The password protected and encrypted laptop will be just fine remaining in the locked vehicle until you retrieve it. (It may not be, but seriously, get over it.)

How bad is the weather? Can it be reasonably navigated (such as 4 inches of snow or less)? How late is it? Is it imperative to get home as soon as possible? Is it possible to shelter at work/location until the next day? Most parents are going to think “I need to get home now!” to ensure their family is safe. Overcome this anxiety and collectedly assess.

Communications is important. Gather information via phone calls or radio. Have important numbers, emails, contacts in your phone. Have the very important ones hardcopied in your GHB notebook. It’d even better to understand HAM radio, repeaters, and have those you’re trying to reach equally versed. Some threat events will not allow communications. What is your school’s policy on holding kids until parents come? Do you and your spouse have a plan to enact in the case of no-vehicle no-communications? What is expected of each of you?

Hint: Texts will often go through a cellular system even though voice calls cannot.

Fully understand the situation as it pertains to you.


In the vehicle

A vehicle has ample space to store needed equipment and supplies and costs little resources to move it about. There are several things that can be put in the vehicle as options, and chosen for inclusion in the human-portable GHB to be used (we are assuming we will have to abandon the vehicle).

Common in-vehicle gear includes:

  • Weather appropriate clothing.
  • Emergency blankets.
  • Emergency food, water.
  • Tools.
  • Maps/Atlas.
  • Communications (CB, HAM).
  • Electronics charging.

Of these, only a few items will be helpful during a worst-case Get Home effort. The maps, probably. Weather appropriate clothing, as long as it is suitable for hiking/mobility. “Stadium warmth” bulky clothing may be ill-suited for high exertion and mobility (but will be desirable for sheltering). Some food, some water. Useful tools may be limited to a saw, small hatchet, and pry bar. Bottom line, though, is all the stuff in the vehicle that could help the situation isn’t necessarily human-portable. Trying to drag it may not be helpful.


Primary activity: Walking

In a Get-Home situation, the primary activity will be walking. Yes, luck may provide a ride, or the vehicle is accessible, but we must plan on this 25 mile walk. What is needed for a walk of this magnitude?

First, we must be in reasonable shape. That means training. Recreational backpacking and hiking is the ultimate answer here. Proficiency with this activity will turn a get-home event into nothing more than a hike with more urgency than usual.

Hint: much of the gear obtained to enjoy this hobby will be directly usable in a get-home bag.

A practiced hiker/backpacker carries a 30 pound load for 8-10 hours a day on unimproved trails, averaging about 3 miles per hour on mostly level terrain. In those 8-10 hours are approximately 15 minute breaks per hour, a lunch taking about an hour, and generally one morning and afternoon extended “packs off” break of 30 minutes. Assuming a full 10 hour day, this equates to 3 hours of break, giving a total range of 7 hrs x 3 mph = 21 miles.

Some of the discontinuities in this data and the Get-Homer are that he may not be a ‘practiced hiker’. The stamina and surefootedness are earned. Another discontinuity is the 30 pounds of gear are recreation-intent, light weight  equipment designed to support a pleasurable hobby. Much of it translates (such as a sleeping bag), but some does not. The Get-Homer may need protective weapons, tools to secure supplies (such as pry bars, etc), communications, and more. Water sources may not be as well understood as a researched and planned hike, resulting in more carrying.

Planning and training are critical to helping ensure a successful get-home excursion.

Pro tip: Store your phone and all spare batteries near your body while walking. The cold will greatly reduce battery life. Your body heat will prolong it. Keep conversations short. Possibly keep the phone off and only power on once an hour to send updates.


Secondary Activity: Shelter

Outdoorsmen spend a significant amount of time balancing clothing’s ability to retain heat during sedentary times and shedding heat during mobile times (assuming winter). High quality outdoor gear is made for this. Sweat is enemy number one. Gear selected must be versatile enough to accomplish these things. Modern military wear, prosumer-grade outdoor gear, and high-end hunting gear is designed explicitly for this. It must be researched, it must be tested. Shelter is survival priority number 1. Understanding the clothing in one’s gear must also be.

One of the assumptions was that the ‘event’ causing a Get-Home excursion to be necessary happened later in the day. In northern USA in December winter it gets dark at 5 PM. Worst case is setting out later than this, but much later and there should be a very compelling reason to set out and not wait until morning.

It is unlikely the average person will be able to hike through the night. Training and equipment may allow it, but after 4-5 hours the urge to bed down somewhere will be evident. Finding shelter is an art unto itself, as is making expedient shelters from natural resources. Abandoned vehicles, utility buildings, retail outlets, and more can serve as a means of getting out of the elements. The goal is simple: Get out of the elements, and find a way to retain warmth.

The expectation of getting a good sleep should be removed. It will be a shivering, cold, poor sleep filled with anxiety. It may even only be for a few hours before the weariness fades and the urge to get home overtakes it. All this should be expected. To help ensure the possibility of a regenerative sleep, we should be versed in fire making, have at least a very warm wool blanket, and a means of getting out of the elements. A good silicon impregnated nylon tarp is an excellent light-weight means of providing shelter. Whether in an ‘A-frame’ configuration or even as a lean-to setup to help retain some fire warmth, the wind/snow block is important.

The wool blanket may seem like a heavy, archaic form of sleep system, but it has multiple advantages over a sleeping bag. First, it is easy to get out from under in the event of a threat or other quick-reaction event. A sleeping bag can become a warm coffin in such a situation. Secondly, it retains some warmth retention even when wet, as the fibers are naturally hydrophobic. Thirdly, while wool may singe due to embers from the fire, it does not destructively melt like nylon will. Fourth, it can act as a cover or wrapping and still allow the user to be mobile.

Pro-tip: A mylar blanket does little to keep one actually warm. In a lean-to setup with a tarp, use the emergency blanket inside the nylon tarp to help protect it from embers as well as reflect a substantial amount of the fire’s heat back towards you.


Supporting equipment and activities

There are a number of training items, equipment, and necessities to support a get home excursion of this magnitude and under worst cases. The following items are a short list with some explanations.

Handgun and ammunition: Desperate times bring out the worst in some people and the best in others. It is despicable to prey upon someone in times of need. Protection is a foundation of all preparedness, and the fact that you’ve prepared does not create an obligation to help those that have not, no matter how desperately they demand or beg. The handgun keeps your life yours, and your things yours, unless you choose to do otherwise. Without it, the choice will be made for you by evildoers. Training required for effectiveness.

First aid kit: Moving out of one’s normal actions and environments brings inherent risk due to unfamiliarity. Risk potentially leads to injury. An adequate firs aid kit is essential, as is the training to use its contents.

Layered clothing: Everyone in the USA understands the idea of layering. No need to write more here.

Fire starting: Bic lighters, ferro rod, some dryer lint, and a half hour searching for suitable fuel gets you a fire. Know how to start one, know how to keep it going. Training required for effectiveness.

Hydration: K&B recommends a 40 oz widemouth Klean Kanteen with single wall construction. When moving, odds are water will not freeze unless it is exceptionally cold. The steel container can be used to boil water, or at least warm it up well for added comfort. Water filters are useless in the cold (the element will break from freezing). Melting snow is generally safe, but time consuming. Aquamira tablets can be used to purify water, but extend the reaction time recommended if the water is too cold. The average person will need 40-80 fl oz for a trip of this magnitude, and will be slightly dehydrated at its conclusion. Plan on 120-160 fl oz for this trip if possible.

Nutrition: A trip of this magnitude is able to be accomplished without food, but the body will be expending up to 4000 calories each day. No food will make it colder and more difficult. Some food, such as a high calorie emergency ration, or freeze dry meal, will be very beneficial.

Illumination: There are 3 categories of illumination: low level but long duration, medium, and high illumination with short duration. It’s important to have all three in one’s kit. Glow sticks are excellent for 4-6 hours (in the cold) where low illumination is all that’s needed. A headlamp can provide medium illumination (most have multiple settings now for low light and bright light, trading off duration). High intensity tactical flashlights are essential when defensive measures are required.

Cash: For a Get-Home situation, silver and gold will be utterly useless. Yes, survivalists of old, they will. A get-home situation is most likely at the onset of a threat event, and society as a whole will not have acclimated to a precious metal monetary paradigm. It would take weeks and possibly months for that. Cash on hand buys you options. Maybe some skis at the store, maybe a ride on a truck that was unaffected by the event, maybe a night in a hotel somewhere. Cash is versatility to obtain lacking resources.

Battery backups: Have spare batteries for all electronics. Spare batteries should be stored on one’s person to prevent power loss. For maximum resiliency use lithium ion batteries and buy gear that is compatible with Li-ion.

10 Essentials: Outdoorsmen have long understood the necessity of the 10 essentials. In their quest to pare down weight for more enjoyable hiking, they often remove things not used or seldom used from their packs. The exceptions are the 10 essentials, which stay a part of the pack regardless of frequency of use.

  1. First-aid kit.
  2. Knife.
  3. Sunglasses and sunscreen.
  4. Extra clothing.
  5. Rain gear.
  6. Firestarter and matches.
  7. Extra water.
  8. Extra food.
  9. Headlamp or flashlight.
  10. Map and compass

Some of these are covered elsewhere. The utility of the rest of these items should be self-evident.

Navigation: Using GPS apps, maps, and compass should all be a well-practiced skill set. GPS and map datums should match. Maps should NEVER show destinations! Plot courses to the nearest major intersection or significant landmark that you know how to get home from. Label each route home. Ensure your spouse has copies of these routes in case they have a working vehicle and can safely rendezvous with you (assuming you have communications).  Likewise, have copies of their routes. Annotate with water sources, caches, shelter options, and other resources. Maps should be durable.


Everyday Carry on-body (Tier 1) and Get Home Bag (Tier 2) Checklist:

Tier 1 Tier 2
Protection
Handgun Yes N/A
Spare mag 1-2 mag 2 mag
Holster Yes N/A
Melee handheld Tactical pen
Tactical flashlight
N/A
Long Gun N/A N/A
Scabbard/sling N/A N/A
Spare Mag N/A N/A
First aid
First aid kit Pocket Kit First Aid Kit
Medications in Pocket kit N/A
Shelter
Daily clothing Yes N/A
Headwear N/A Wool hat

Full brim hat

Face covering N/A Shemegh/ bandana
Filter/Respirator
Spare Underwear N/A Yes
Base layers N/A 1 Merino Wool
Midlayers N/A N/A
Heavy layers N/A Yes
Shells N/A Yes
Gloves (not work gloves) N/A 1 pr glove liner

1 pr heavy

Socks N/A 1 pr midweight wool

1 pr heavy weight wool
1 pr sock liner

Footwear N/A Hiking / Winter
Fire starting N/A Bic Lighter x2
Ferro Rod
Tea candles x2
Fire perpetuation N/A N/A
Fuel N/A N/A
Shelter (expedient) N/A N/A
Shelter (normal) N/A SilNylon tarp
Insulation/Bedding N/A Silk bag liner
Mylar blanketWool blanket 1-2
Hydration
Water N/A 40 fl oz
Purification N/A Aquamira

Floss / Carbon / Bottle

Container N/A Klean Kanteen
bladder
Nutrition
Foods N/A Yes (2 servings)
Preparation items N/A N/A
Serving items N/A N/A
Hygiene/Personal
Nail clippers N/A Yes
Toothbrush/paste/floss N/A (optional)
Soap N/A Yes
Towel N/A Yes
Disposable wipes / TP N/A Yes
Hand sanitizer N/A Yes
Deodorant N/A N/A
Spare Glasses Yes Yes
Rescue / Mitigation
Knife Folding Full tang
Spare folding
Multi-tool N/A Yes
Pry bar N/A Yes
Saw N/A (folding optional)
Tape/Fastening N/A 20′ duct tape
10 large zip ties
Hatchet N/A (optional)
Safety glasses N/A Yes
Work gloves N/A Yes
Needle/thread N/A Yes
Compass N/A Yes
Maps N/A Work to Home
GPS app / handheld smartphone N/A
Pace counters N/A Yes
TX/RX Radio + charger N/A Yes
Cell phone charger N/A Charging block
USB cord
Signal mirror N/A Yes
Emergency whistle N/A Yes
Flashlight Surefire E2D N/A
Headlamp N/A Yes
Glowstick N/A x2 red

x2 green

Ziplock bags N/A 4
Garbage bags N/A 2
Paracord N/A 100’
Emergency currency $100 in $20’s $100 in $5’s
$100 in $20’s
USB Drive + documents N/A Yes
Spare batteries N/A Battery block for phone
Tac Light: 1 refill
Headlamp: 1 refillOptics: 1 refill
Notepad N/A Yes
Pack N/A approx 2000 ci

NOTES ON USING THIS CHECKLIST:

  • Items marked N/A may not appear on that tier (for instance, you’re not expected to have 4 glow sticks on-body carry) but may be applicable for another tier. Items that have N/A for both tiers shown might be a bug-out-bag (tier 3), or bug-out-vehicle (tier 4) item.
  • Some items have hyperlinks with suggested product.


Everyday clothing and the martial artist

Originally published on 20JAN2011 for Examiner.com

K&B, LLC co-owner and instructor Don Alley is a martial arts, personal protection, and emergency preparedness writer. Many of his articles originally appeared in Examiner.com. As these articles are able to be retrieved from old web caches, they will be posted here.

Martial artists tend to look at their clothing a bit differently than others. The practice in the dojo with a dedicated uniform (called a dogi), is a traditional rationale that ensures neatness, safety, and uniform training, such as lapel grab techniques. It also help ensure student safety in the case of jewelry or other accessories that may cause cuts, strangles, or other injury. Once off the mats, many martial artists look for qualities in their clothes that are similar to a dogi.

Allowing for a full range of motion is important, especially with kicking arts. Martial artists look for looser fitting clothing, pants with gusseted crotches, and durable but lightweight  fabric to withstand the rigors of a fight. When clothes become too restrictive, it can impede the ability to use a technique or throw a useful kick. One’s clothing should not be on the side of an assailant.

For footwear, light athletic style shoes are preferred, which will help protect the feet but still allow for the speed necessary to launch kicks or perform footwork. Of course, traction plays an important part of this. When dress shoes must be worn, it is beneficial to look for something that can serve as well as an athletic shoe. More and more men’s dress shoes are adopting athletic type soles and treads. Women, though, have a hard time finding shoes that offer function as well as fashion.

Many martial artists have a few items they choose to carry as well, and having extra pockets, or easily accessible compartments helps a lot.  Of course, having multiple pockets is a great way to ensure having multiple defense mechanisms, so if one finds themselves in some type of pin or hold, there is always something accessible. Carrying stuff in a bag, backpack, satchel, or purse is asking for trouble, as these items can be readily removed, or forgotten. It’s best to have one’s protection items on-body carried.

For men, cargo pants come in a variety of styles now, from very baggy and casual to an almost Docker-esque business casual style. Add in a regular polo shirt, and decent casual shoes, and the martial artist dressed as such can be ready for an altercation without fear he will be limited or restricted by clothing choices.

Women have it a bit harder, but dressier slacks and finding a decent flat style shoe is possible.

So, when clothes shopping, keep your requirements in mind. Ensure all the tools you train with are available to you, and consider what, if any, limitations the clothing considered will bring.

A Michigan family’s ‘threat matrix’

Originally published on 18FEB2011 for Examiner.com

K&B, LLC co-owner and instructor Don Alley is a martial arts, personal protection, and emergency preparedness writer. Many of his articles originally appeared in Examiner.com. As these articles are able to be retrieved from old web caches, they will be posted here.

In preparing contingencies for emergencies or other events, it is essential to start by assessing exactly what one is preparing for. These events, which are simply called “threats,” are really a way to categorize and determine the probability of their occurrence. In evaluating the threats the typical urban/suburban family faces in Michigan, we look to the local weather, infrastructure, and socioeconomic histories. The “matrix” part of the phrase comes when the contingencies and preparations for each of these threats is addressed and evaluated. Some of these contingencies will be addressed in later articles.

For local severe weather events, Michigan has a history of strong thunderstorms, tornadoes, flash floods, and snow storms. Luckily, these occurrences are generally well predicted and some advanced warning is usually available. So while severe, some preparations can be made ahead of time. Michigan does not see hurricanes, tidal waves, or widespread drought.

Infrastructure threats, such as power failures, are commonplace in Michigan. Detroit residents face poor medical and police response times from overworked public service providers.  Having many industrial areas, Michigan has faced forced evacuations in the past due to chemical leaks. Rural Michiganders have faced forest fire evacuations. All families face house or apartment building fires. Michigan does not typically face water shortages or sewage issues, nor are there any wild animal or insect plagues that can leave areas decimated without warning.

Socioeconomic threats consist of unexpected layoffs, being fired, or facing involuntary pay or hour reductions. These are threats, in that it affects a family’s financial capability to maintain itself and grow. Other threats in this category are violent crimes acted upon family members, home break-ins and robberies, or areas of civil unrest (think Detroit circa 1969).  These can be at home or wherever a person visits, such as the workplace, school, or en route to places.

Locally, Michiganders face national threats as well. The Cold War brought a long and sustained threat of thermonuclear warfare. Acts of terrorism normally assumed to happen only in the Middle East have happened in the USA and may continue to. A poor economy has contributed to a decline in the US Dollar’s value, which can cause alarming price increases and could lead to hyperinflation. Some scientists believe that Global Warming will have unforeseen effects on our climate. The Peak Oil theorizers believe that oil will become so scarce that it will cost more energy to obtain it than the oil itself.

The purpose of this article is not to tell the reader what to think, or what to prioritize, but rather to understand the threats that each Michigan family may face, and begin to determine what preparations each family can make to reduce the risk of harm from these threats. As stated above, this side of the “threat matrix” is just the threats. When contingencies are created, it will be realized that being prepared for one of these threats can actually carry over into being prepared for many.

Lessons from the under-prepared

Originally published on 16FEB2011 for Examiner.com

K&B, LLC co-owner and instructor Don Alley is a martial arts, personal protection, and emergency preparedness writer. Many of his articles originally appeared in Examiner.com. As these articles are able to be retrieved from old web caches, they will be posted here.

The power goes out in Livonia. It’s 7 p.m. in February, and it’s already dark. The television our example family was huddled around has dimmed. After a few moments, their eyes adjust to the new light level, and a flashlight is found at the bottom of the junk drawer. With a quick twist of the bevel the little two AA battery lights up to provide a meager amount of light. As the room is scanned, the little light goes out leaving the family in the dark once more. The batteries in that thing were three years old, never replaced since the thing was bought at the Do-It-Yourself store on sale. After much fumbling, raiding a kid’s toy for some batteries while wishing fresh batteries were in hand, and using the dim light of a cell phone screen for illumination, the little light is operational once more.

“Daddy, it’s getting cold in here. I’m scared.”

The furnace ignition runs on electricity, as do the blowers. With the 22° F temperature outside, with lows dropping into the teens, the house’s insulation will not hold in the warmth for long. After this half-hour ordeal, it’s time to consider the power won’t be back on tonight. It’s time to get to a hotel.

“Honey, I’ll get the kids packed, you make reservations”, the wife says.

The husband agrees, and goes to the computer to look up the nearest hotel and the number. Of course, the computer is not working, and the cable modem is down. Where’s the phone book? Do we even have a phone book? Never mind that, just getting to the hotel should be enough, they have rooms.

After everyone is packed for the night’s stay at the hotel, the house has dropped 10 more degrees. Loading everyone into the car, the garage doors are opened… wait… there is no power. They aren’t opening. Getting out, pulling the emergency handle and lifting manually, the car is finally clear to be taken out. Lowering the garage door, the manual pull cord doesn’t seem to snap back in place.  Back inside the garage to shut it. The handle is finally pushed back in place so it locks into the automatic opener’s track.

Walking through the house to the front door, the husband exits and goes to lock the door. The keys are in the car. After getting the keys, locking the door, getting in the car, and going, it’s been over an hour, and probably longer, before the family is on the road.

Add in rounding up multiple kids, worrying about pets, and other concerns, this time could easily extend into two or three hours, only to arrive at a hotel that is full, or doesn’t allow the family cat.

This example has played out countless times in the southeastern Michigan as well as any metropolitan area. There are so many “oops” moments in the example above, yet they are continuously repeated time and time again.

In the example above, simply routinely changing batteries in the emergency flashlight could have saved 20 minutes or more. Having multiple flashlights stashed in various rooms will cut down on the “zombie walk” through the house while searching.

Having wood for the fireplace (if the home is equipped) or a decent fixture for gas fueled fireplaces can take the edge of a winter night without power. Knowing how it works is essential. Without a supplemental heat source, having a set time to wait for the power to come back on before deciding “bug out” to a hotel is a good idea. Worst case, some money is spent on a room and the kids can enjoy the pool.

Having an actual phone book can be an indispensible resource. Additionally, use some post-it notes to mark off certain anticipated things, such as hotels, the pet’s veterinarian or kennel, the local urgent care, etc. Cell phone towers usually have back-up power, so make the necessary calls quickly before too much cellular traffic makes it difficult to get through.

Having pre-prepared bags with a couple changes of clothes, toiletries, small reserve supplies of medication required, a few comfort items, and a small book of other important information can eliminate the packing-up phase. Having a supply of cash in the bags can help buy needed items when the credit card readers aren’t working.

Knowing what devices in the house run on electricity and how to operate them without electricity can save time and headache. During a situation is not the ideal time to learn this, knowing and practicing ahead of time is. How hard are the garage doors to disengage and reengage from the automatic system? Does the house alarm have a battery back-up? How does the water get shut off and pipes drained so they don’t freeze? Which one is that handle? Is the sump pump going to work? Will there be flooding?

What hotels are in the area? Were they affected as well or do they have power? Do they take pets? Will they in an emergency such as this? What’s the best way to get there?

The fact is, there are actually very few “emergencies” in our lives, but lack of preparation or emergency equipment elevates these situations into far more uncomfortable or dangerous scenarios. Having even basic preparations for simple scenarios can save a lot of discomfort, injury potential, and worry.

The 72 hour kit

Originally published on 17FEB2011 for Examiner.com

K&B, LLC co-owner and instructor Don Alley is a martial arts, personal protection, and emergency preparedness writer. Many of his articles originally appeared in Examiner.com. As these articles are able to be retrieved from old web caches, they will be posted here.

Emergency preparedness is not something that can be bought. Knowledge, training, and know-how are far more important to make a bad situation more bearable than merely having “stuff”. Adequate knowledge on what to do in a given situation can save a lot of time, which can save lives. Conversely, knowing how to fix a car and not having a wrench to do so is equally ill-minded. So, having the right tools in place can make a difference. The “72 hour bag” is one such item. At first, the concept of a 72 hour bag sounds like the stuff of survivalists and tin foil hat wearers. The people that load up an expedition sized backpack with enough junk to rebuild society have given an unfortunate stigma to the preparedness concept. The 72 hour bag detailed here will be far more tailored to family preparedness. Taking the basic requirements of food, clothing, and shelter as well as extended requirements such as hygiene/medication, protection, and documentation, some basic lists for the contents of the 72 hour kit can be determined.

Each person in the family should have a 72 hour kit.

First, look at food requirements. There should be enough food in the kit to provide 9 decent meals for its owner. This is a total of 9000 calories for an adult (factoring in extra calories in case of exertion). Of course, this is emergency food, so ideally something that supplies required nutrition and has a long shelf life is available.  One such suggestion is a high energy food bar, such as Millennium Bars, Power Bars, etc, that are designed to provide high calorie content and energy. These have the added benefit of being a peel-and-eat item rather than something that needs to be prepared. Similarly, drink mixes like single serving Gatorade can add calories as well as provide electrolytes if the situation calls for a lot of exertion. If there are any dietary restrictions, the food selections must be chosen to address these restrictions. If children are also being provided for, having a few treats can go a long way to making a bad situation more bearable.

For clothing, include some items that are versatile. Sturdy work gloves can be included, as well as a wool cap. Include a pair of pants and shorts, as well as a couple extra pairs of undergarments and socks. A fleece jacket should be added, as well as a couple short sleeve shirts. This allows for layering. Ensure seasonal gear like a scarf or mittens is included.  In a kid’s bag, ensure the clothing included is updated often enough so the clothes actually fit. Include swim suits in case the “bug out” is to a hotel with a pool.

Shelter options can depend greatly on how a person may bug out of any given situation and what their destination is. If prepping for a power failure and a hotel bug out is anticipated, then there are virtually no shelter requirements. If bugging out to a friend’s house, having a “car camping” type sleeping bag for everyone may be wise, or at least a decent blanket or two. If the bug out involves going to a cottage, cabin, or deer camp somewhere, it may be necessary to have a decent sleeping bag and tent.

Some hygiene and medication considerations should be considered. For women, feminine hygiene products should be included for 3-5 days. For regular toiletries, the usual soap, shaving cream, razor, toothpaste, etc should be included, as well as a wash cloth and towel. The complimentary hotel-size containers are ideal for this application. If medications are regularly taken, include a supply of them, possibly even longer than the 3 day requirement. Those little 1-week dispensers are a good idea for pills and vitamins. For things like insulin, consider a special battery powered cooler with a solar recharging kit. If an emergency is anticipated, move a portion of the medication supply to the small cooler.

Consider at least one protection item for the family. If the state allows it, consider obtaining a concealed pistol permit. Have at least a couple loaded magazines and a firearm available (in a safe), and transition it to a holster (not in the kit itself!) when a bug out occurs. Failing that, a knife, small baton, or other tool that can serve a defensive role should be considered. Emergencies bring out the finest qualities as well as the most despicable in mankind, and protecting one’s family is a priority.

For documentation, have a small binder with hardcopies of important documents as well as printed scans of others, such as insurance policies, birth certificates, house titles, social security and other identification, etc. These can be printed on waterproof paper or put in a protective sleeve (such as a zip-lock bag).  Also consider using a USB thumb drive with more documents as necessary. It is advisable to create a self-extracting encryption file from these with a password you will remember.

Borrowing from camping, also consider some of the “Essentials”. Map, compass, sunscreen, flashlight, first aid kit, matches, rope, and knife.  Have a spare set of car and house keys for all the vehicles and locks.

The last thing to consider is the bag itself. Depending on the full intent of the bag, it can vary from a reasonably large school-style bag to a mid-size backpacking bag. It should definitely be something that is easily carried, so a shoulder strap is a good minimum, if not a backpack style with a moderate waist belt. The quality of the bag should allow it to be durable to storage and usage elements. Decent commercial-grade bags are sufficient. Dollar store, free promotional items, or thin material and inadequate construction should be avoided. Some go so far as to get military specification gear, but this isn’t necessary. Of course, some military surplus gear, or easily obtained items in this genre should be considered. A good “overnight” backpacking bag is a very good size to go with.

In upcoming articles, this kit will be a basis for many emergency preparations. Doing some research on the 72 hour bag and what should go in it is a great way to start to understand the concept of preparedness and is a relatively easy way to at least ensure some tools are available in a bad situation.


Achieving family preparedness through camping and backpacking, part 2

Originally published on 12SEP2011 for Examiner.com

K&B, LLC co-owner and instructor Don Alley is a martial arts, personal protection, and emergency preparedness writer. Many of his articles originally appeared in Examiner.com. As these articles are able to be retrieved from old web caches, they will be posted here.

Last week, we introduced the idea of using Michigan backpacking and camping as a fun recreation that has an ancillary effect of helping Michigan families prepare for emergency situations. Today, some traditional backpacking gear will be examined, and how it relates to a preparedness and survival situation. While gear isn’t necessarily as important as skills or experience, starting with gear may help those new to these outdoor recreations accumulate gear that can have multiple uses besides merely backpacking. First, shelter is a very important survival requirement. Insulating one’s self from the elements is necessary in many weather conditions. To do this, tents and sleeping bags are used.

For a tent, backpacking requirements force most people to consider an ultra-light three-season option. These tents are generally designed to withstand high winds, and the use of technologically advanced materials and engineering concepts make them both lightweight and rugged. If part of your emergency preparations may require you to hike out of an area on foot or in a makeshift “vehicle” (such as a flood), then a small, easily carried tent will be more manageable than a car-camping intent tent. Some more hardcore “survivalists” are concerned about EMP (Electro Magnetic Pulse) weapons used against the United States which may disrupt many forms of electronics. These individuals speculate such an attack would destroy the electricity generation infrastructure of an affected region, and may even destroy handheld or battery operated devices (such as a car’s engine controller or a cell phone). For individuals with this level of concern and preparedness, an ultra-light backpacking tent is ideal if their plans involve hiking, biking, or skiing to a “bug out location”.

For others, a car-camping intent tent is ideal. It is larger and more spacious, and will allow greater storage of family and stuff. For plans to stay with relatives where room may be at a premium, or plans to “bug out” to an evacuation area by motor vehicle, this option may be ideal. (As a note, if emergency preparedness plans for any family include “bugging out”, it is best to have routes, permissions, and area knowledge of the destination). For widespread evacuations, having a family sized tent may bring a greater sense of comfort and “home” at a relocation center.


Sleeping bags are a second item to help insulate people from the elements. Where the tent shields people from rain, sun and wind, a sleeping bag shields its occupant from the cold. There are many factors involved in choosing a sleeping bag, and since it is such an individual choice, there is no real one-size-fits-all solution. In general, sleeping bags are rated to a certain temperature. This is a general rating only, and some peoples’ comfort ranges are different. To achieve that rating, insulation is used. Insulation can be natural (goose down) or synthetic. In general, goose down is more compact and lighter for the insulation it provides, but is very susceptible to being wet. Once wet, it will not provide insulation. A synthetic insulation is slightly heavier, and typically does not compact as well as down, but these tend to maintain their insulative qualities.

For purchasing a a sleeping bag that can double-duty as a piece of preparedness gear, my recommendation is to get something in the 15 degree F range with synthetic insulation. Especially in Michigan, where rainfall and dampness is common, a synthetic bag will be a more versatile tool.

To store sleeping bags, do not leave them compressed in their storage bag, for easy retrieval in a go-bag or 72-hour bag. The continued compression can cause them to lose loft, and thus lose insulation rating. Store the bag in a breathable cotton bag that is big enough to store loosely. These are best kept in a very large tote or seal-able tub until they are needed.